
You're stopped halfway up a residential hill, with headlights blinking in the mirror and a queue forming behind you. The car hasn't stalled, but you can feel the pressure building. You release the brake, hesitate over the accelerator and wonder whether the car will move forward or drift backwards.
That moment feels alarming because many learners bring a manual hill-start mindset into an automatic. There's no clutch biting point to find, but there is still a precise transition between holding the car securely and asking it to move. The examiner isn't looking for theatrical pedal work. They're looking for safe observation, controlled movement and sensible use of the car's systems.
Table of Contents
- Why Automatic Hill Starts Feel Different
- The Brake-to-Throttle Technique on a Hill
- Using Hill-Start Assist, Auto-Hold and the Electronic Parking Brake
- What the Driving Examiner Actually Wants to See
- Common Myths and Mistakes Learners Make
- Practice Plan and Final Checklist
Why Automatic Hill Starts Feel Different
A steep residential hill exposes the difference quickly. In a manual, you manage clutch bite, accelerator pressure and the risk of a stall at the same time. In an automatic, select Drive and the gearbox may produce creep as you ease off the brake. Some cars also use hill-start assist to hold the brakes briefly. The RAC guide to hill starts explains why these features can make an automatic feel easier on a gradient.
The car can still roll backwards. Creep may not overcome a steep slope, and a slow move from brake to accelerator, an abrupt brake release or insufficient power can allow movement in the wrong direction. A small rollback is judged by its control and consequence, not by whether you used one prescribed technique. If the car moves back slightly and you immediately regain control without affecting another road user, the examiner may treat it as a minor control fault. A rollback that continues, creates risk or requires intervention is more serious.
The practical aim is simple: keep the vehicle secure, check the road and make a deliberate transition into forward motion.
What changes for your feet
Your right foot does the work. It operates both brake and accelerator, while your left foot stays clear of the pedals. Left-foot braking may seem convenient because there is no clutch, but learners commonly press too hard or react slowly when changing pedals. One-foot control gives you a repeatable routine.
The transmission changes the car's response. A torque converter can soften the effect of the gradient, and Drive commonly provides useful forward creep. Other ratios or driving modes may respond differently, so learn the particular vehicle rather than relying on assumptions. For help choosing transmission, see this manual or automatic guide.
Practical rule: Treat an automatic hill start as a controlled brake-to-throttle transition, not as a clutch exercise.
Electronic assistance supports control; it does not replace observation. Check the road, understand which aids the vehicle has and remain responsible for deciding when it is safe to move. Examiners assess the result, including clearance, control and safety, rather than demanding a specific combination of brake, accelerator or parking-brake inputs. That distinction removes much of the anxiety, while still requiring you to handle the car properly.
The Brake-to-Throttle Technique on a Hill
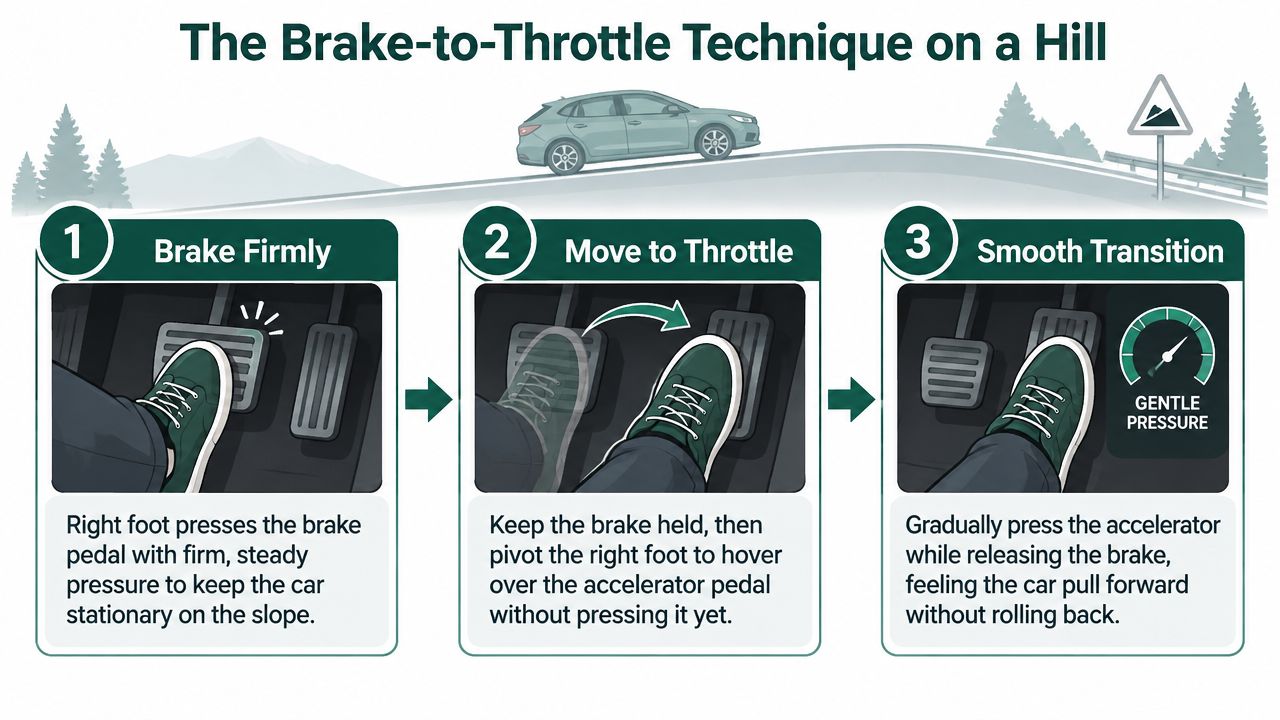
Approach the gradient with the car properly secured. Keep your right foot pressing the brake firmly enough to prevent movement, leave your left foot tucked away from the pedals and hold the steering wheel with both hands where practical. If you're stationary at a junction or behind traffic, select Drive and keep the vehicle under control rather than relying on creep before you've checked the road.
Set the car before asking it to move
Complete your mirrors and blind-spot checks before releasing the brake. Check ahead for pedestrians, cyclists, parked vehicles and approaching traffic, then signal when the situation requires it. On a narrow residential hill, look beyond the immediate car in front. A vehicle may appear around a bend just as you begin moving.
With the brake still held, pivot your right foot towards the accelerator. Don't stab at it. Apply light, progressive pressure, enough to raise the engine's effort slightly above idle and make the car feel as though it's preparing to pull against the slope. You're looking for a steady forward response, not a dramatic surge.
As the car begins to resist gravity, ease off the brake smoothly. The transition should feel continuous. If you lift too quickly, the car may roll before the accelerator has taken effect. If you press the accelerator sharply, the car may lurch forward, which creates a different control problem at a junction or near a parked vehicle.
The Fast Track hill-start guide is useful for comparing the manual and automatic routines, but the automatic version remains centred on managing the brake, creep and accelerator rather than finding a clutch biting point.
When the parking brake helps
A parking brake gives you an extra layer of control when the slope is uncomfortable or the traffic behind is close. Keep the footbrake applied, engage the parking brake, then prepare the accelerator. As the car begins to pull forward, release the parking brake smoothly and continue with gentle throttle.
Confident drivers may use brake-hold or a progressive throttle-led pull-away, especially where the vehicle's systems are familiar. On a steeper incline, the important adjustment is timing. You may need to establish forward drive before releasing the brake rather than expecting creep alone to do all the work.
Watch the following demonstration after you've read the sequence, then practise it with an instructor who can monitor the car's movement and your observations.
Using Hill-Start Assist, Auto-Hold and the Electronic Parking Brake
Electronic aids can reduce pressure on a hill, but each system behaves differently. Hill-start assist usually holds the brakes briefly after you release the footbrake. It prevents immediate rollback while you move to the accelerator, but it is not a substitute for prompt, controlled input.
A common learner error is releasing the brake, then hesitating while searching for the accelerator. The hold may expire before the car receives enough drive. Apply the accelerator positively and progressively while the system is active. The system's purpose is to support the change from braking to forward movement, not to keep the vehicle secured indefinitely.
Auto-hold and parking brakes
Auto-hold can keep the car stationary after you stop, even when your foot leaves the brake pedal. That can help in queues or at a junction, although its operating conditions differ between vehicles. Some cars require the driver's belt to be fastened and the door to be closed. Check the dashboard symbol before relying on it.
The electronic parking brake is usually controlled by a button on the console or dashboard. Many cars release it automatically as you pull away, but the behaviour depends on the vehicle and the conditions. Before using it on a slope, learn its warning sound, dashboard symbol and release response. If the system does not release as expected, keep the car secured and follow the vehicle handbook rather than forcing the pull-away.
Using aids during the driving test
DVSA permits test vehicles fitted with electronic parking brakes and hill-start assist, so you may use those features during the test when the car has them. The GOV.UK guidance on using your own car confirms that electronic equipment of this kind is not excluded.
The examiner is assessing your control, observation and safety, not a particular button sequence. Complete the required observations, choose a safe gap, apply the accelerator smoothly and stay ready to respond if the aid behaves differently from expected. A system that holds the car does not remove your responsibility to check around you or control the vehicle's movement.
Read the owner's manual before the lesson and confirm the dashboard indicators with your instructor. On an icy or muddy slope, tyre grip can limit the result even when the electronics are working correctly. Practise enough to recognise the vehicle's response, then use the aid as support rather than treating it as an automatic solution.
What the Driving Examiner Actually Wants to See
The examiner isn't waiting for a textbook manual routine. An automatic has no clutch pedal, so there's no reason to reproduce clutch-balance technique with the brake and accelerator. The assessment centres on control, observation and safe progress.
UK driving-test guidance says examiners should usually look for the ability to move off on a reasonably steep uphill gradient where possible. It also treats an automatic hill start as a control-and-observation task. The practical sequence is familiar: select Drive, keep the car secured with the footbrake or parking brake, check mirrors and blind spots, then release the brake smoothly as you apply light accelerator pressure.
How rollback is judged
A tiny movement backwards isn't an automatic fail. The examiner considers what happened next. If the car slips slightly and you regain control without creating a risk, that may be recorded as a driving fault. If the rollback places another road user in danger, risks a collision or shows a serious loss of control, the consequence can be much more severe.
There isn't a useful fixed distance that learners can rely on. The risk depends on the road, the traffic, what's behind you and how quickly you respond. A small slip towards an empty space is not the same event as rolling towards a waiting vehicle or pedestrian.
The examiner marks the consequence and the quality of control, not whether you used one fashionable technique.
Handbrake use, brake-hold and hill-start assist can all be valid. Examiners care whether the method keeps the car secure and allows you to move off safely. They'll also notice the preparation around the manoeuvre, including mirrors, blind-spot checks, signals and anticipation of traffic on the incline.
A route through a town may include residential roads, junctions and mixed gradients rather than a dedicated hill-start location. If the route doesn't offer a suitable slope, the examiner can assess moving off elsewhere as appropriate. The official DVSA examiner guidance reflects the broader principle that control and safety matter more than a single prescribed method.
For a fuller explanation of how faults are recorded, use this driving-test mark sheet guide. The practical takeaway is simple: secure the car, observe properly and make smooth forward progress.
Common Myths and Mistakes Learners Make
The most damaging hill-start myths turn a manageable routine into a panic response. Learners often hear that any rollback means an instant fail, but that isn't how the examiner's judgement works. The size, duration and consequence of the movement matter, along with whether the driver corrects it safely.
A handbrake also isn't compulsory on every automatic hill start. It's a valid method and can be helpful on a steeper slope, but an automatic test doesn't demand one particular brake routine. Footbrake control, hill-start assist, auto-hold and an electronic parking brake can all be used when the vehicle is properly controlled.
The shortcuts that create trouble
- “An automatic can't roll back.” It can, particularly if the gradient is steep or the driver releases the brake before establishing forward drive.
- “Electronic aids are cheating.” They're part of the vehicle and can be used in the test when fitted. You still have to observe and manage the car.
- “More revs always solve the problem.” Stamping on the accelerator can produce a jerky launch and may leave you too close to traffic or a parked vehicle.
- “The handbrake must always be applied.” It's useful, but the examiner assesses safe control rather than a ritual.
- “A steeper hill needs a completely different routine.” The same brake-to-throttle transition applies. You adjust the timing and amount of accelerator to suit the gradient.
The assumption that creep will always be enough causes just as much trouble as over-revving. Creep is a support, not a promise. If the car starts to move backwards, return to a secure brake hold, reassess the space around you and try again with earlier, smoother throttle input.
Anxiety makes learners chase shortcuts. The reliable answer is to practise the vehicle's response until you can feel when the car has begun to pull, then keep your attention on the road rather than staring at the pedals.
Practice Plan and Final Checklist
Practise progressively rather than starting in heavy traffic. Begin on a quiet residential slope with a qualified supervisor or instructor, then work towards busier uphill junctions, multi-storey car-park ramps and ordinary test-route conditions. The steepest local hill you can safely use is valuable practice, provided the road, weather and traffic make it suitable.
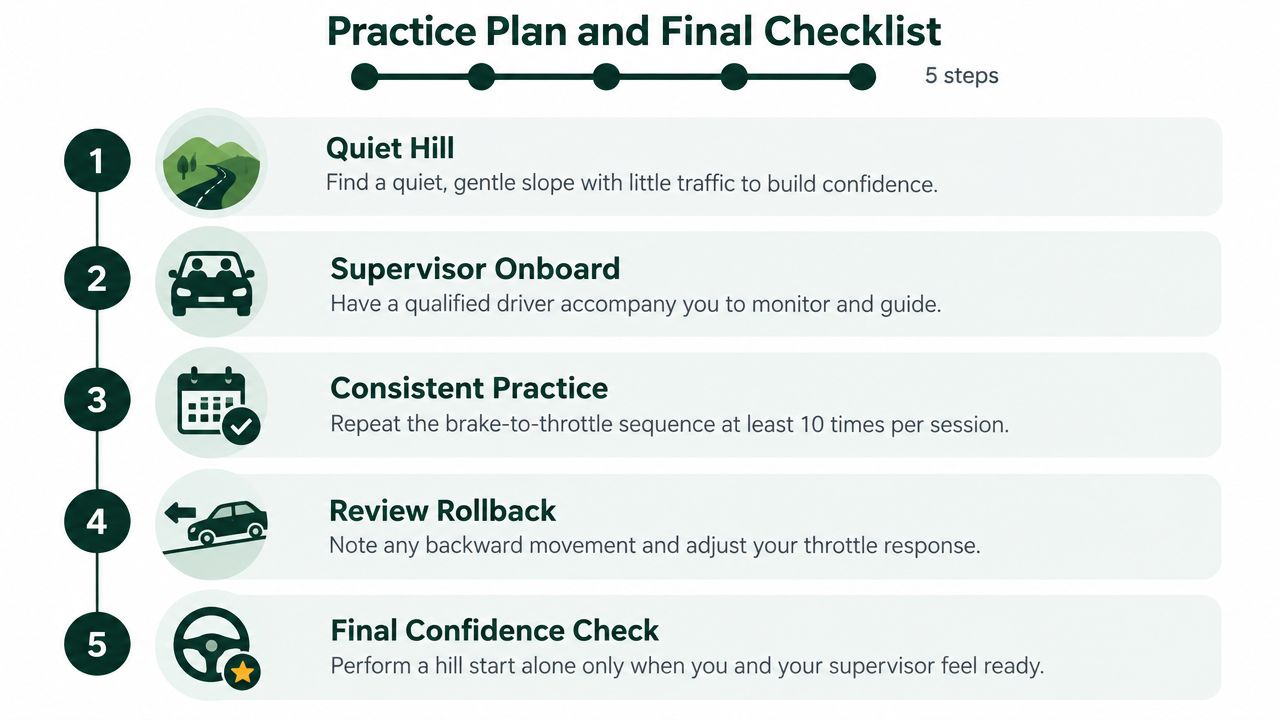
Use this compact checklist during lessons:
- Foot position: Keep the left foot clear and use the right foot for both pedals.
- Brake hold: Secure the car before selecting your moment to move.
- Observation: Check mirrors and blind spots, then signal where needed.
- Throttle transfer: Apply gentle accelerator pressure before easing off the brake.
- Pull-away: Let the car build controlled forward movement instead of forcing it.
Repeat the routine until the transition feels predictable, then ask your instructor to introduce distractions such as traffic waiting behind or a junction at the top of the slope. A mock test on gradient-heavy roads can reveal whether anxiety, observation or pedal timing is the issue before the examination.
Fast Track Driving Lessons offers manual and automatic tuition with DVSA-approved instructors, plus structured intensive and semi-intensive courses, mock tests and local test-route preparation. If hill starts automatic car practice is holding back your confidence, visit Fast Track Driving Lessons to find tuition matched to your transmission, area and availability.
Written by Fast Track editorial team.